|
|
|
|
Make Waves!
This tutorial was written on December 8, 2002 I'd like to thank MagicCharm at GI Graphics for her
assistance in getting this tutorial ready and to Tracey for the original idea. |
|
|
You will need the wave.gif. Get it Here. |
|
|
Ready? Let's get started!
|
|
|
Open a new file in Paint Shop Pro the same size as your animated gif, in this case 312 pixels wide by 100 pixels tall, transparent.
Flood fill your image with the background color you want. I used white.
Add a new layer. Flood fill with color of your choice, I used white again. This is the color you will see surrounding your text. Due to the nature of this tag, it cannot be tranparent, but if you use the background color of the page or message board where you plan to use it, it will give the illusion of being transparent (example below).
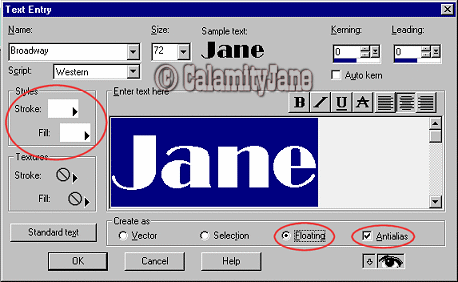
With Layer2 active, select your text tool and type your text, floating, antialias checked. Use a wide font. I used "Broadway." I recommend using the largest font size that will fit in the space you have. I used 72. Words with more letters will need to be smaller.
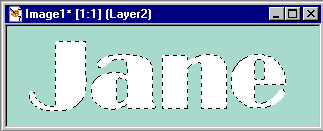
Move the text where you want it (a central placement works best) and then defloat it (ctrl-shift-F). IMPORTANT: Do NOT deselect your text. Hit the "delete" key. You should see the background color inside the letters and the shape is still selected.
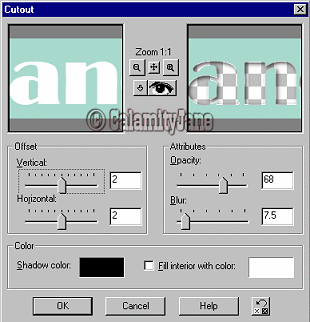
Go to Effects > 3D Effects > Cutout (The settings I used were Vertical and Horizontal 2, Opacity 68 and Blur 7.5 with Black as the shadow color and fill interior NOT checked.)
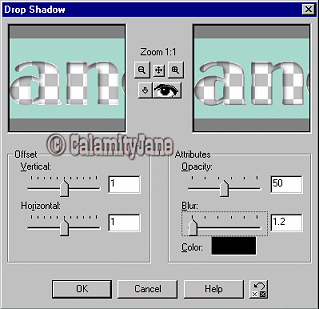
Go to Effects > 3D Effects > Drop Shadow (The settings I used were Vertical and Horizontal 1, Opacity 50 and Blur 1.2 with Black as the shadow color.
Go to Effects > 3D Effects > Drop Shadow. Change Vertical and Horizontal to -1 and choose OK.
Deselect (Ctrl-D).
If you are using a darker foreground color, zoom in and paint over any background pixels that show on the outside of the letters.
Save your work. Save your file as something you will remember to delete later. I used "image1.psp"
Go to File > Jasc Software Products > Launch Animation Shop.
Open "wave.gif" in Animation Shop. You will see it has 4 frames and a speed of 15. Minimize it.
Now open the psp file you just saved in Animation Shop. Widen the window so you can see both frames. Click on the white filled background frame in the psp file and copy (Ctrl-C). Paste as a new animation (Ctrl-V).
Duplicate this image 3 times, then select and delete one frame so that it has 4 frames like the wave file. Select all frames (Ctrl-A) and set Animation frame properties to a speed of 15 1/100th of a second (same as the wave animation).
Click now on your text frame from Animation1 and copy it (Ctrl-C). Paste as a new animation (Ctrl-V) and duplicate 3 times, deleting one frame to make 4 frames total as you did in the previous step. You may now close Animation1 because we are finished with it. Don't forget to delete it later.
Now we will be making a 'sandwich' of these three separate animations. We are going to put the white background on the bottom - the wave frames in the middle and the text frames on top. Restore your Wave animation. Select all frames of the wave animation (Ctrl-A). Copy them (Ctrl-C). Click on Animation2 and select all frames (Ctrl-A). Paste the wave into the frames (Ctrl-E).
Repeat this step for the text (Animation3), pasting it into Animation2 over the wave.
You now have your basic tag (Animation2). Crop your new tag to your liking. Select "Save as" under the File Menu and give it a name.
I hope you have enjoyed this tutorial. Here are some examples of tags I've made this way. You can use many different animations for the same type of effect.
Posted by permission of SterlingSea of Addicted to PSP: her sig tag based on this tutorial. Great work Sterling! ©2002 by CalamityJane - All rights reserved. |